Showing posts with label completed rooms. Show all posts

Monday, April 29, 2013

kids room revisited

Our beautiful baby has nearly outgrown her bassinet. So, the time has come to revisit the layout of our second bedroom so we can fit three little kiddies in there. New carpet (yay!). New bunk beds. New shelving. And the sides will go back on the cot before baby sleeps there of course.

Check it out...


Saturday, November 24, 2012

the boys' bedroom!

Presenting another (almost) complete room! My boys' bedroom has been a tricky one - and there are still numerous things in the wardrobe that I'm not sure what to do with, but I'm pleased with the massive progress that has been made. My aim was to create a more organised space to allow my boys to more easily do what they do best - play!

Here's what I started with:

I am extremely fortunate to have such a great space for our boys to play and (sometimes) sleep. It also helps to have the built in wardrobe - this was one of the first things we added when we moved in. But, I was not using the space well. The biggest issue was clothes! How a small person can have so many, I will never know. But, by storing outgrown clothes in large, sealed tubs in the garage, I managed to free up lots of space and start organising things better.

Check out what I've done so far:


Installing safety mesh on the window allowed us to adjust the room layout, but the major changes took place behind closed doors!
  • I bought a pack of shelf plugs so that I could put the shelf back into the bookcase cupboard. This almost doubled the storage space and allowed easier access to the toys.
  • To create more space for the boys' clothes, I bought an Ikea Jall clothes organiser and used large Ikea Kasset document boxes as makeshift shelves. I kept the lids underneath each one to add strength and protect the box. As you can see, they fit perfectly into the hanger and slide in and out really easily. It looks neat too! 
  • I have also gathered bits and pieces from the top of the cupboard into a large Ikea Garnityr box with lid. These are the perfect size for the top of the wardrobe and can fit heaps in them.
  • I have used cheap storage tubs under the single bed for storing extra linen and also different categories of toys. There is a 'car box', a 'Thomas set box' and a 'Duplo train set box'. Keeping the same kinds of toys together (or sets) in the one box or bag has made it easier to stay organised. The boys can find exactly what they want - and are able to help pack up again before we get something else out!

I want to share some organisational highlights with you too...


  • Craft drawers: these plastic drawers from Bunnings, while not cheap, are a fantastic modular solution for storing craft things in almost any space. The different shelf options mean that almost anything can fit into them. The clear fronts mean that you can find what you're after at a glance. And, the drawers pull right out, so you can take the whole thing with you to the table.
  • Shoe basket: after becoming fed up with only ever being able to find one of each shoe, I added a 'shoe basket' to the cupboard. The boys can put their shoes away in it - and also find them again!
  • Pyjama bag: most mornings are a bit of a rush, so the pyjama tops and bottoms would end up wherever the owner happened to be when they were removed - and there they would stay until I had to search for them in the evening. But now, I spend a moment gathering all the pjs and putting them into the designated 'pyjama bag' which hangs on the back of the bedroom door. Pretty sure this one was my husband's idea. Yay!
  • Laundry basket: not much to say about this. But, it helps for the boys to have their own place for dirty clothes. (Matchbox cars and the like also turn up in here from time to time - so it pays to check before I dump the lot into the washing machine.) This basket also becomes a fun toy on the odd occasion when it's empty.
  • Compact toys: living in a two bedroom unit has heightened my radar for toys that can be folded down and put away. My latest find ($5 on ebay!!) is this multi-level matchbox car set that folds down into a wheel with a carry handle. (This one was fantastic to take on holidays too!) We also have a water play system, play tents and a tunnel that twist and fold back into compact storage bags that are all currently stored under the toddler bed. 

Things are about to change again as we soon welcome another child into our home. That will mean more clothes and toys in use - and another sleeping space to sort out. 

But, I'm confident that, with the organisational start I've made, we'll be just fine.

Saturday, December 31, 2011

the kitchen!

I've been completing a little bit here and there in the kitchen for months now. From the start I thought I would like to have it completed by the end of the year.
Well, I've just scraped in!

Here is what I started with:


Surprise, surprise - another embarrasing mess!

Here is what I did with the kitchen, with help from my lovely husband...

I think the pictures will speak for themselves, but I'll still point out a few highlights.
  1. Installing a shelf above the bench to keep the space clear for preparing food. ($50 from Ikea)
  2. Purchasing a set of tins to keep bread, tea, coffee etc in. ($16 from Kmart)
  3. Investing in Tupperware! The Access Mate "Veg Out" containers were $117.65 for both. I justified this expense by repeating a "they have a lifetime guarantee!" mantra in my mind. My husband loves these. They are much more suitable for potatoes and onions than the rotting box we had previously. And they are impenetrable for creepy crawlies!
  4. Ikea shelf inserts in plates and glasses cupboards.
  5. Large plastic tubs for plastic containers and bake ware. (About $6 each from Kmart). These allow the containers and drink bottles to be a little more organised and I can lift them out easily to access the "occasional use items" in the hidden corner of the cupboard.
  6. Moving all the dishes, bowls and platters that I use all the time into a more accessible place. 
  7. Getting a new bin. We now have a bin that has two sections; a smaller section on the left for rubbish and a larger section on the right for recycling. (About $70 from Bunnings from memory). Now the recycling doesn't float all around the place in an enviro bag. Much better!


I actually feel excited to be starting a new year with a new kitchen! My whole family has noticed the difference. We can find things we need more easily, and I don't feel angry every time I need to prepare a meal for everyone. I think a happy cook produces better food. 

And, just today, James came in as I was adding the final sparkle and said "thanks for cleaning the kitchen, mum!" Nice to know I am appreciated :)

The challenge now will be to maintain that level of cleanliness. All I can do is try.

Happy New Year to you all. May next year be full of love, fun and organisation!


Friday, September 30, 2011

the laundry

The laundry is the smallest room in our house. It was also a dumping ground for all of our bits and pieces that didn't quite fit anywhere else. I'm sure you are fully aware of this, but it is really hard to use a space for its intended purpose when it is full of junk.

The state of the laundry was a major contributing factor to the clothes washing never being up to date. If I needed to use the sink, I had to move things out of it, onto the top of the washing machine. Then, when I needed the washing machine, I just moved things back again.

It was also becoming a bit of a black hole. I had completely lost track of what was in there. The time for purging was long overdue. Here is what I started with:


I know. It was pretty bad.

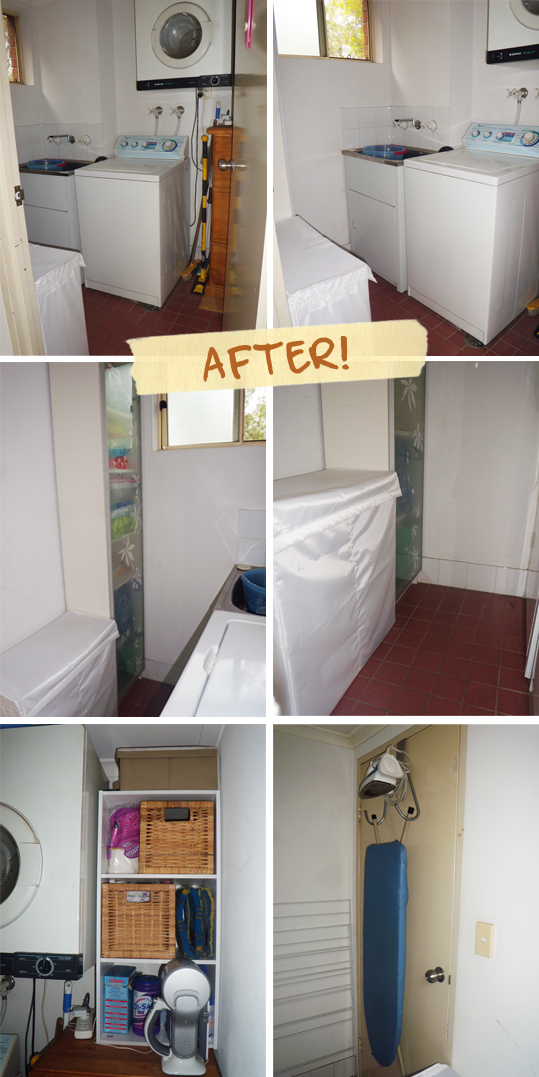
Even after moving or throwing out things that shouldn't have been in there, more storage was needed. So, thankfully, when I was looking for a storage cabinet for the bathroom, I found a person selling a pair of cabinets! I put the matching one ($60 on ebay) into the laundry. It now holds some cleaning products and chemicals up the very top, as well as beach towels, swimming accessories, enviro bags and left-over plastic bags.

I created more space for the broom and mops by moving the washing machine closer to the sink. It is so much better with them out of the way. I also found a small bookshelf that just squeezed into the space above the filing cabinet in the corner. ($19.95 from DealsDirect). That space is no longer wasted and now holds the dust buster, floor fibres, spare tissue boxes and paper towel, laundry powder, and two small Ikea baskets (donated by a friend) that keep the tea towels and cleaning accessories in order.

A fantastic contraption that I was already using - the only 'organised' thing in the room - is an over-the-door ironing board holder. (I think it may have cost around $10 from Aldi). It's great and frees up more floor space.

A friend also recommended getting a split laundry basket (Ikea Skubb laundry bag $17.99) which allows you to sort dirty clothes and linen before you are ready to wash. So, I got one and it just fit in the space that was left. I couldn't believe how perfectly it all fit in. I was very pleased. I love being able to have things there, ready to be washed but out of sight. So much better than when I was just dumping clothes and sheets on the floor in the doorway.

Well, here it is. Another completed room:


It took a while to find the right things to fit in this small space, but the search was worth it. It has been so much easier to keep the space tidy and functioning well because everything now has it's own spot.

When I walk into the laundry now, rather than feeling disorganised and annoyed,
I actually feel a sense of achievement. Another small victory!

The down side?
I now have one less excuse for not being up to date with the washing ;)

I am now taking a deep breath as I look at the rest of the house. Two rooms down, four big ones to go...

I found the laundry to be a challenging space to work with, so would love to hear what struggles / solutions / stories you have with your own.

Wednesday, May 25, 2011

the balcony

I'm ready to share another victory in my organisational battle... the balcony!

We love to spend time on the balcony. We eat, we chat, we sit, we play, we paint.
But the setup used to be a bit of a disaster. While it did often become an explosion of toys, the major problem was the outdoor dining setting.

We only bought the table and chairs two years ago, and we bought it for this balcony. We spent so much time focussed on whether the table would fit, that we didn't even think about the chairs. Because the chairs were a 'laid-back' style, they took up so much space. We had to position the table and chairs in a 'diamond' configuration just so they would fit, and even then, it was quite a squeeze to get in and out. If you were unlucky enough to get a seat near the end wall, then you were stuck there til someone else moved out of the way. So it just didn't fit well, but we made do.

Also, when choosing a WHITE setting, we seemed to completely forget about the fact that we live next door to a freight train line! Oh, the soot. So much soot.

What were we thinking!? We weren't.

So, we agreed that we were both getting increasingly frustrated with the big, white, dining set, so, I was given the go ahead to sell that one and find something more appropriate. Boy was I excited!

Here is what we started with:


A mess, basically.

So I set to work researching different dining settings and configurations. We wanted to have at least four seats with a table, but we wanted to maximise play space when it wasn't in use too. So I was doing google searches for "compact outdoor dining" and the like. There were a few possibilities that popped up, but I think the final choice well and truly ticked the "compact" box.

Here's what I came up with:


It is a wicker dining setting with a tempered glass table top ($499 brand new from ebay). I added picture frame dots (approx $5 from Mitre 10) to the table top to keep the glass from sliding. You will see in the photo bottom, right, that all of the chairs slide in together underneath the table when not in use. Look at all the space!! I have also been covering the table with a nice cloth to keep the table top clean between uses. (Thanks for the suggestion, mum!)

Bit of a shame it only came with cream cushions, though. They are now cream, with pink and green chalk, and small dirty foot prints. At least they zip off and are machine washable.

Thankfully, I was able to sell our old setting for $100. (Yay ebay, again!)

I also bought some brick grip hooks ($20 for a pack of two on ebay), as you will see bottom left. These are brilliant. We can hang our candle lanterns on the balcony without having to drill into the wall. Plus we can move them around if we want them somewhere else. These hooks just "grip" the bricks, as the name suggests, and you hang your stuff on them. All this wind lately has put them to the test, but they haven't budged. I thought it would be good to be able to have something a little bit decorative out there since we don't have enough direct sunlight to support any plant life. We couldn't even grow a grass head out there!

It looks so nice on the balcony now with the new setting and the candles lit in the evening. During the day, the boys run around like crazy out there, and they use the table and chairs as a cubby house too. (They find so many uses for these things!) We are getting better at putting away the toys when we are finished with them. I also decided that the tiny magnetic letters and numbers from the white board should be hidden away for a while. They are a pain to clean up, and too many of them were ending up on the balcony below. Oops!

In the end, though, I think my eldest is just pleased that he now has a great spot to "sit and watch the world go by."

Tuesday, May 3, 2011

the bathroom is complete!

That's right, folks. The "Get Sorty" project in my bathroom is, more or less, complete! While things may have seemed a little quiet on the blog front, I have actually been at work. Chipping away here and there and getting all the more closer to realising my organisational dreams.

The reason I began with the bathroom is because it is a room that contains items which I have absolutely no emotional attachment to. It was very easy to get in there and turf unwanted and unused items. After I threw away (or gave away) a few bags of toiletries and other random items, I planned my solution. It took a little bit of time to research and track what I was after, but I think it was worth the wait.

This is what the bathroom was like before...


One problem I had was that everything was just shoved into the drawers or cupboard wherever there was space. This meant that no one could ever find anything and when you did locate what you were after, you would end up pulling out about five other things with it.

Another thing was the assortment of towels piled onto the towel racks. Not only did it look dreadful,
but nothing ever dried properly either. I don't know about you, but I prefer not to 'dry' myself with a damp towel. (shudder)

Finally, I thought the storage of the bath toys could be improved too.

So, here is my solution...

To address the major problem of clutter in the vanity, I invested in some drawer dividers ($4 from Kmart), a shelf insert ($4.99 from Ikea) and large woven bags ($16.99 set from Ikea). These allow us to keep most of our bathroom bits and pieces within different categories. It looks a lot neater and we can actually find things!!

I also spent quite a while looking for the ideal cabinet to fit towels and other toiletry items in. We were fortunate to have a space of approximately 400mm between the toilet and bath to fit something in. I'm sure you'll agree that what I found looks great and fits so much in it. It is originally from Ikea, but I paid $60 for it on ebay. I really love the frosted glass with floral design.

Initially for our towels I thought a freestanding towel rail might be the go, but my husband suggested that he could simply install another double towel rail. Genius! He had installed an extra towel rail two years ago, but unfortunately they no longer make that style in white. So rather than have a chrome towel rail sticking out like a sore thumb, we opted to get the cheapest white rail we could find. A hard task since the current 'in' thing is chrome. ($50 from Bunnings)

I also bought a plastic basket for the bath toys to keep them contained at the end of the bath. ($4 from Kmart) I chose this kind because I assumed that it would be likely to end up in the bath with the boys. And I was right. It ends up in the bath every time! 

One last thing I would still like to do is get my husband to make a small shelf insert for the cabinet. (I'm yet to tell him this - The Ikea ones were about 10mm too deep. Bummer!) This will allow us to fit our medicine bottles in a safer place high up in the cabinet

And there you have it! One room down, five to go...