Showing posts with label space saving. Show all posts

Monday, April 29, 2013

kids room revisited

Our beautiful baby has nearly outgrown her bassinet. So, the time has come to revisit the layout of our second bedroom so we can fit three little kiddies in there. New carpet (yay!). New bunk beds. New shelving. And the sides will go back on the cot before baby sleeps there of course.

Check it out...


Saturday, November 24, 2012

the boys' bedroom!

Presenting another (almost) complete room! My boys' bedroom has been a tricky one - and there are still numerous things in the wardrobe that I'm not sure what to do with, but I'm pleased with the massive progress that has been made. My aim was to create a more organised space to allow my boys to more easily do what they do best - play!

Here's what I started with:

I am extremely fortunate to have such a great space for our boys to play and (sometimes) sleep. It also helps to have the built in wardrobe - this was one of the first things we added when we moved in. But, I was not using the space well. The biggest issue was clothes! How a small person can have so many, I will never know. But, by storing outgrown clothes in large, sealed tubs in the garage, I managed to free up lots of space and start organising things better.

Check out what I've done so far:


Installing safety mesh on the window allowed us to adjust the room layout, but the major changes took place behind closed doors!
  • I bought a pack of shelf plugs so that I could put the shelf back into the bookcase cupboard. This almost doubled the storage space and allowed easier access to the toys.
  • To create more space for the boys' clothes, I bought an Ikea Jall clothes organiser and used large Ikea Kasset document boxes as makeshift shelves. I kept the lids underneath each one to add strength and protect the box. As you can see, they fit perfectly into the hanger and slide in and out really easily. It looks neat too! 
  • I have also gathered bits and pieces from the top of the cupboard into a large Ikea Garnityr box with lid. These are the perfect size for the top of the wardrobe and can fit heaps in them.
  • I have used cheap storage tubs under the single bed for storing extra linen and also different categories of toys. There is a 'car box', a 'Thomas set box' and a 'Duplo train set box'. Keeping the same kinds of toys together (or sets) in the one box or bag has made it easier to stay organised. The boys can find exactly what they want - and are able to help pack up again before we get something else out!

I want to share some organisational highlights with you too...


  • Craft drawers: these plastic drawers from Bunnings, while not cheap, are a fantastic modular solution for storing craft things in almost any space. The different shelf options mean that almost anything can fit into them. The clear fronts mean that you can find what you're after at a glance. And, the drawers pull right out, so you can take the whole thing with you to the table.
  • Shoe basket: after becoming fed up with only ever being able to find one of each shoe, I added a 'shoe basket' to the cupboard. The boys can put their shoes away in it - and also find them again!
  • Pyjama bag: most mornings are a bit of a rush, so the pyjama tops and bottoms would end up wherever the owner happened to be when they were removed - and there they would stay until I had to search for them in the evening. But now, I spend a moment gathering all the pjs and putting them into the designated 'pyjama bag' which hangs on the back of the bedroom door. Pretty sure this one was my husband's idea. Yay!
  • Laundry basket: not much to say about this. But, it helps for the boys to have their own place for dirty clothes. (Matchbox cars and the like also turn up in here from time to time - so it pays to check before I dump the lot into the washing machine.) This basket also becomes a fun toy on the odd occasion when it's empty.
  • Compact toys: living in a two bedroom unit has heightened my radar for toys that can be folded down and put away. My latest find ($5 on ebay!!) is this multi-level matchbox car set that folds down into a wheel with a carry handle. (This one was fantastic to take on holidays too!) We also have a water play system, play tents and a tunnel that twist and fold back into compact storage bags that are all currently stored under the toddler bed. 

Things are about to change again as we soon welcome another child into our home. That will mean more clothes and toys in use - and another sleeping space to sort out. 

But, I'm confident that, with the organisational start I've made, we'll be just fine.

Thursday, November 24, 2011

command delete GIVEAWAY!

In case you didn't already know, I really value all of you who take the time to read my blog. Thank you for reading my posts and for your informative and encouraging comments. By doing this you are keeping me on task and excited about my goals to provide a more sane environment for my family.
So, to say 'thank you' - and also because I'm feeling
a bit festive - I am running a giveaway!


I am excited to be able to give one lucky reader a brand new Boon Frog Pod. Valued at $69.95, this funky bath toy storage system will keep your bath more organised and tidy than it has ever been. It's drainable scoop lets you gather and rinse toys, helping to prevent scum and mildew issues. The wall-mounted base, with built-in shelf, holds all your essential bath products. And it sticks really well to bath walls with semi-permanent adhesive strips, but won't harm tile or wall surfaces. (There's also an option to screw it onto your tiles if you prefer.) 

Bonus: With the Frog Pod your child may actually want to help clean up!


How to enter:

If you would like to go in the draw to win this prize, simply comment on this post, and tell me; what is your child's favourite bath toy? 
OR what is your own favourite bath toy?

Make sure you include your full name in your comment so I can identify and contact you if you are the winner. (If you have been referred by a friend, please include their name as well.)

This giveaway is only for people who have an Australian postal address.

I will be randomly drawing a winner on Thursday 1st of December after 2pm. 

Good luck!

Friday, September 30, 2011

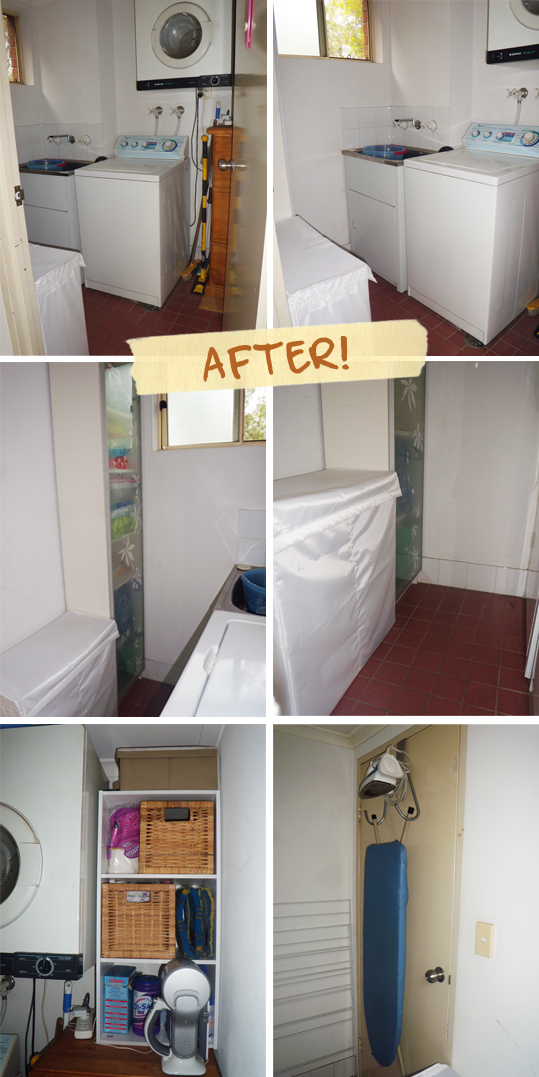
the laundry

The laundry is the smallest room in our house. It was also a dumping ground for all of our bits and pieces that didn't quite fit anywhere else. I'm sure you are fully aware of this, but it is really hard to use a space for its intended purpose when it is full of junk.

The state of the laundry was a major contributing factor to the clothes washing never being up to date. If I needed to use the sink, I had to move things out of it, onto the top of the washing machine. Then, when I needed the washing machine, I just moved things back again.

It was also becoming a bit of a black hole. I had completely lost track of what was in there. The time for purging was long overdue. Here is what I started with:


I know. It was pretty bad.

Even after moving or throwing out things that shouldn't have been in there, more storage was needed. So, thankfully, when I was looking for a storage cabinet for the bathroom, I found a person selling a pair of cabinets! I put the matching one ($60 on ebay) into the laundry. It now holds some cleaning products and chemicals up the very top, as well as beach towels, swimming accessories, enviro bags and left-over plastic bags.

I created more space for the broom and mops by moving the washing machine closer to the sink. It is so much better with them out of the way. I also found a small bookshelf that just squeezed into the space above the filing cabinet in the corner. ($19.95 from DealsDirect). That space is no longer wasted and now holds the dust buster, floor fibres, spare tissue boxes and paper towel, laundry powder, and two small Ikea baskets (donated by a friend) that keep the tea towels and cleaning accessories in order.

A fantastic contraption that I was already using - the only 'organised' thing in the room - is an over-the-door ironing board holder. (I think it may have cost around $10 from Aldi). It's great and frees up more floor space.

A friend also recommended getting a split laundry basket (Ikea Skubb laundry bag $17.99) which allows you to sort dirty clothes and linen before you are ready to wash. So, I got one and it just fit in the space that was left. I couldn't believe how perfectly it all fit in. I was very pleased. I love being able to have things there, ready to be washed but out of sight. So much better than when I was just dumping clothes and sheets on the floor in the doorway.

Well, here it is. Another completed room:


It took a while to find the right things to fit in this small space, but the search was worth it. It has been so much easier to keep the space tidy and functioning well because everything now has it's own spot.

When I walk into the laundry now, rather than feeling disorganised and annoyed,
I actually feel a sense of achievement. Another small victory!

The down side?
I now have one less excuse for not being up to date with the washing ;)

I am now taking a deep breath as I look at the rest of the house. Two rooms down, four big ones to go...

I found the laundry to be a challenging space to work with, so would love to hear what struggles / solutions / stories you have with your own.

Wednesday, May 25, 2011

the balcony

I'm ready to share another victory in my organisational battle... the balcony!

We love to spend time on the balcony. We eat, we chat, we sit, we play, we paint.
But the setup used to be a bit of a disaster. While it did often become an explosion of toys, the major problem was the outdoor dining setting.

We only bought the table and chairs two years ago, and we bought it for this balcony. We spent so much time focussed on whether the table would fit, that we didn't even think about the chairs. Because the chairs were a 'laid-back' style, they took up so much space. We had to position the table and chairs in a 'diamond' configuration just so they would fit, and even then, it was quite a squeeze to get in and out. If you were unlucky enough to get a seat near the end wall, then you were stuck there til someone else moved out of the way. So it just didn't fit well, but we made do.

Also, when choosing a WHITE setting, we seemed to completely forget about the fact that we live next door to a freight train line! Oh, the soot. So much soot.

What were we thinking!? We weren't.

So, we agreed that we were both getting increasingly frustrated with the big, white, dining set, so, I was given the go ahead to sell that one and find something more appropriate. Boy was I excited!

Here is what we started with:


A mess, basically.

So I set to work researching different dining settings and configurations. We wanted to have at least four seats with a table, but we wanted to maximise play space when it wasn't in use too. So I was doing google searches for "compact outdoor dining" and the like. There were a few possibilities that popped up, but I think the final choice well and truly ticked the "compact" box.

Here's what I came up with:


It is a wicker dining setting with a tempered glass table top ($499 brand new from ebay). I added picture frame dots (approx $5 from Mitre 10) to the table top to keep the glass from sliding. You will see in the photo bottom, right, that all of the chairs slide in together underneath the table when not in use. Look at all the space!! I have also been covering the table with a nice cloth to keep the table top clean between uses. (Thanks for the suggestion, mum!)

Bit of a shame it only came with cream cushions, though. They are now cream, with pink and green chalk, and small dirty foot prints. At least they zip off and are machine washable.

Thankfully, I was able to sell our old setting for $100. (Yay ebay, again!)

I also bought some brick grip hooks ($20 for a pack of two on ebay), as you will see bottom left. These are brilliant. We can hang our candle lanterns on the balcony without having to drill into the wall. Plus we can move them around if we want them somewhere else. These hooks just "grip" the bricks, as the name suggests, and you hang your stuff on them. All this wind lately has put them to the test, but they haven't budged. I thought it would be good to be able to have something a little bit decorative out there since we don't have enough direct sunlight to support any plant life. We couldn't even grow a grass head out there!

It looks so nice on the balcony now with the new setting and the candles lit in the evening. During the day, the boys run around like crazy out there, and they use the table and chairs as a cubby house too. (They find so many uses for these things!) We are getting better at putting away the toys when we are finished with them. I also decided that the tiny magnetic letters and numbers from the white board should be hidden away for a while. They are a pain to clean up, and too many of them were ending up on the balcony below. Oops!

In the end, though, I think my eldest is just pleased that he now has a great spot to "sit and watch the world go by."

Wednesday, March 30, 2011

and the food lived happily ever after...

Well, it's certainly looking that way at the moment. A few people have asked how I went with the rolling pantry. I can finally give you an update.

I took a two minute walk around the corner to Mitre 10 a couple of weeks ago. A member of staff saw me standing in front of the castor wheels looking a bit perplexed (there were a LOT of wheels!), so asked if he could help. [Sure. That would be great.] So, I explained, in detail, the issue I was having and told him I needed two inch fixed castor wheels.
He told me the kind that matched my description were out of stock.
[Of course they were. Sigh.]
So, he ordered them in for me.

Almost a week later a got a call saying they were in. [Yippee! - never in my life have I been so excited about wheels.] I took the boys with me straight away to pick them up.
I was just about to pay for them, when [hang on a minute!?], I noticed that they were SWIVEL castor wheels!! [how can it be this hard to find wheels that don't do anything fancy?? They just need to ROLL for goodness sakes!]

I returned home empty handed and a bit grumpy. I wanted the food out of our laundry. So, when the boys had their naps that afternoon, I headed straight for my trusty ol' pal, Ebay! I found exactly what I wanted within five minutes and for a fraction of the usual cost! They were shipped from Queensland and arrived two days later. I then attached them to the pantry myself. I had to sand back a couple of lumps on the wheels to get them running smooth (you get what you pay for), but the end result is a fully functioning rolling pantry.

All of our food is now either in the fridge, beside the fridge in the rolling pantry, or in the two drawers underneath the oven. My friend upstairs informed me that those drawers are the only place in the kitchen that cockroaches can't get into. Win!!

So, I am feeling extremely organised in the food department at the moment. We can see (and reach) all the food we have, it is fairly neatly arranged, and we now have a sensible amount of everything too. I am surprising even myself! Although, I haven't really sorted out the fridge yet. I have been stalling. I am very very afraid of what I might find. Will definitely be wearing gloves for that job!

But, I guess I got my happy ending.
Or is it the beginning...?

Monday, March 7, 2011

the 'rolling pantry'

We are lucky enough to have a decent sized kitchen. Unfortunately, though, it has one major flaw. There is no pantry. Which leaves us with 'the food cupboard.' When we moved in, this is the cupboard that seemed to make the most sense as a food storage area. To our dismay, after a few years of using this cupboard, what we are left with is an absolute atrocity!
Tins, jars, bottles and packets of food are crammed in, pushing whatever was unlucky enough to be there first further towards the back. Most of those items never to be seen again. I am certain a black hole has formed at the back of 'the food cupboard'.

Most of the time, in searching for, lets say - a can of diced tomatoes, we will remove half the contents of the cupboard only to discover that there are no canned tomatoes left. Instead, we find seven tins of tuna (!?) and a couple of packets of out-of-date pasta. As you can tell, there is absolutely no way to keep track of what is there or what we have run out of. It has been a source of much annoyance, too, when we reach in to get something and knock a dozen things onto the floor in the process. I feel my blood pressure rising just thinking about it.

Enter the rolling pantry! In my Google search for some in-cupboard storage solutions, I came across this fantastic contraption. It roped me in with it's blurb... "Imagine having six extra shelves for storing your packets, cans, bottles and jars!... this mobile pantry will wheel out of the way or roll into the narrowest space." This is the answer to our problem! I wrote down the measurements and set to work with the tape measure. Yes! It will fit perfectly next to our fridge!

So much hope was pinned on this fantastic pantry on wheels. I waited in anticipation for weeks. When it finally arrived, the box seemed far too small. Upon opening it, I discovered that this thing required a significant amount of 'assembling'. All I saw were planks of wood and a million tiny screws and wooden pegs. Basically, we had to build the thing from scratch. My husband and I actually had a fun time building the rolling pantry on Friday night, which is just as well, because it took a good few hours.
I was so excited to see it completely assembled in all it's glory! We nudged the fridge across a couple of centimeters, adjusted it's feet (it seems our walls have a slight lean to them) and rolled the pantry in beside it. It fits! I grabbed the handle to roll it back out again and it wouldn't move. It was stuck! What was going on? We quickly realised that the swiveling castor wheels were swinging out from beneath the edge of the pantry and into the wall as they were turning. Garrr!

Long story short... gaffer tape fixes most things but won't stop wheels from swiveling and the pantry is now in the laundry. I am going shopping for some fixed castor wheels some time in the next few days. Will this solve the problem? Time will tell....

I really hope this story has a happy ending.